Setup
How to Set Up an Isopod Enclosure
Introduction: Setting Up Your First Isopod Enclosure
Setting up an isopod enclosure is one of the most important steps in keeping a healthy colony. Fortunately, you don't need an expensive terrarium or complicated equipment to get started with many terrestrial species.
What you do need is an enclosure that retains appropriate moisture, allows sufficient airflow, provides hiding places, and supplies the food and substrate your chosen species needs.
A good setup should also be easy to inspect and maintain. You want to be able to monitor moisture, remove leftover food, and check the colony without constantly disturbing the animals.
This guide walks you through the process, from choosing a container to introducing your first isopods.
Step 1: Choose the Right Container
The first decision is selecting an appropriate enclosure.
Many hobbyists use clear plastic containers because they are inexpensive, easy to clean, and convenient for maintaining separate colonies. Glass terrariums and other suitable enclosures can also work.
Your container should provide enough room for the colony and its substrate while allowing suitable ventilation.
When choosing a container, consider:
- The adult size of the species.
- Your initial colony size and plans for future growth.
- The depth needed for substrate and hiding places.
- How easily you can inspect the enclosure.
- How ventilation and moisture will be managed.
- Whether the lid can prevent escapes.
A small starter container may be sufficient for some colonies, but you should not assume that every species or colony size will thrive in the same volume.
Do Isopod Enclosures Need Air Holes?
Most terrestrial isopod enclosures need appropriate ventilation. The amount of airflow required depends on the species, container, moisture level, and room conditions.
Some keepers use ventilation holes in the lid or upper sides of the container. Others use purpose-designed terrariums with adjustable ventilation.
The goal is to balance airflow with moisture retention. Too little airflow can contribute to stagnant, excessively wet conditions, while excessive ventilation can dry the substrate too quickly.
Any holes or openings should be designed to keep the isopods securely contained.
Step 2: Add a Suitable Substrate
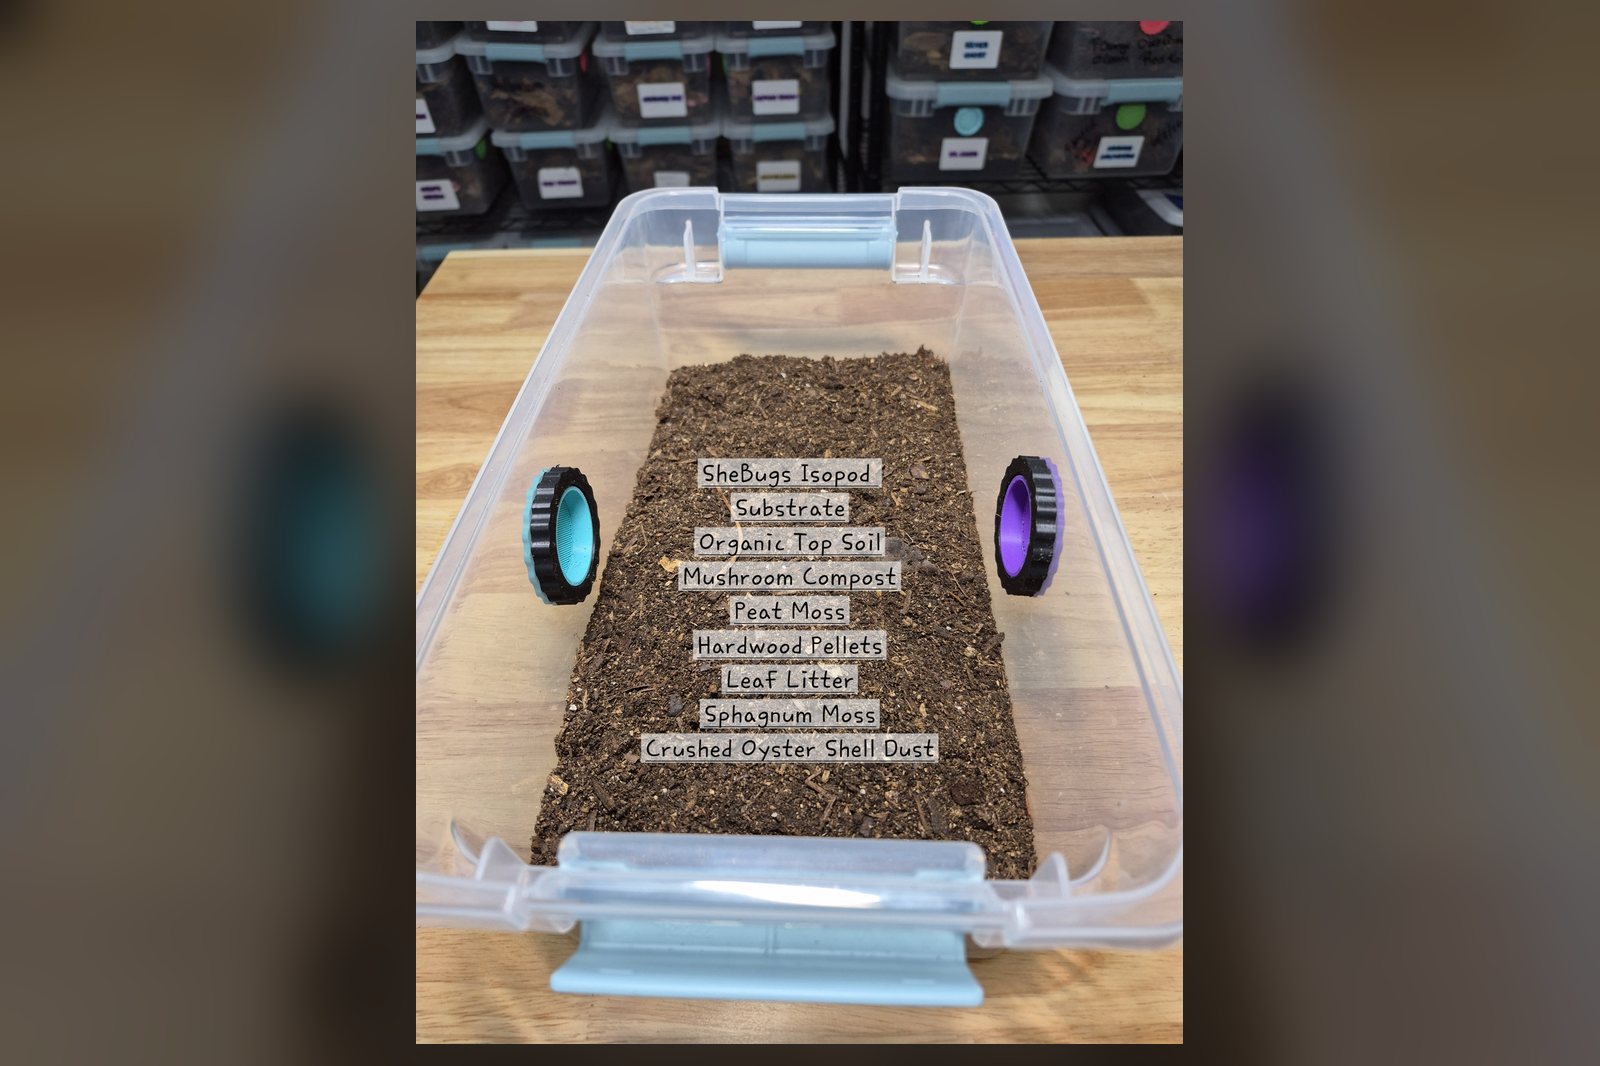
Substrate is more than a floor covering. It helps hold moisture, provides hiding opportunities, and can supply organic material that supports the colony.
For many terrestrial species, a substrate mix containing appropriate organic soil components and decomposed hardwood can be suitable. Leaf litter is often added as a surface layer.
The ideal composition depends on the species.
What Should Isopod Substrate Contain?
Depending on the species and setup, suitable materials may include:
- Organic substrate components without harmful additives.
- Decomposed hardwood.
- Appropriate leaf litter.
- Moisture-retaining material in selected areas.
- Other species-appropriate organic materials.
Use materials known to be safe for captive invertebrates. Avoid soil, wood, or leaves that may have been exposed to pesticides, herbicides, fertilizers, or other contaminants.
Avoid using a generic recipe without checking whether it fits your chosen species.
How Deep Should Isopod Substrate Be?
There is no universal substrate depth for every isopod.
Some species and small colonies can be maintained with a relatively shallow layer, while others benefit from deeper substrate that retains moisture and provides room to burrow.
Consider the species' natural behavior, the enclosure size, and the depth needed to maintain a stable moisture gradient.
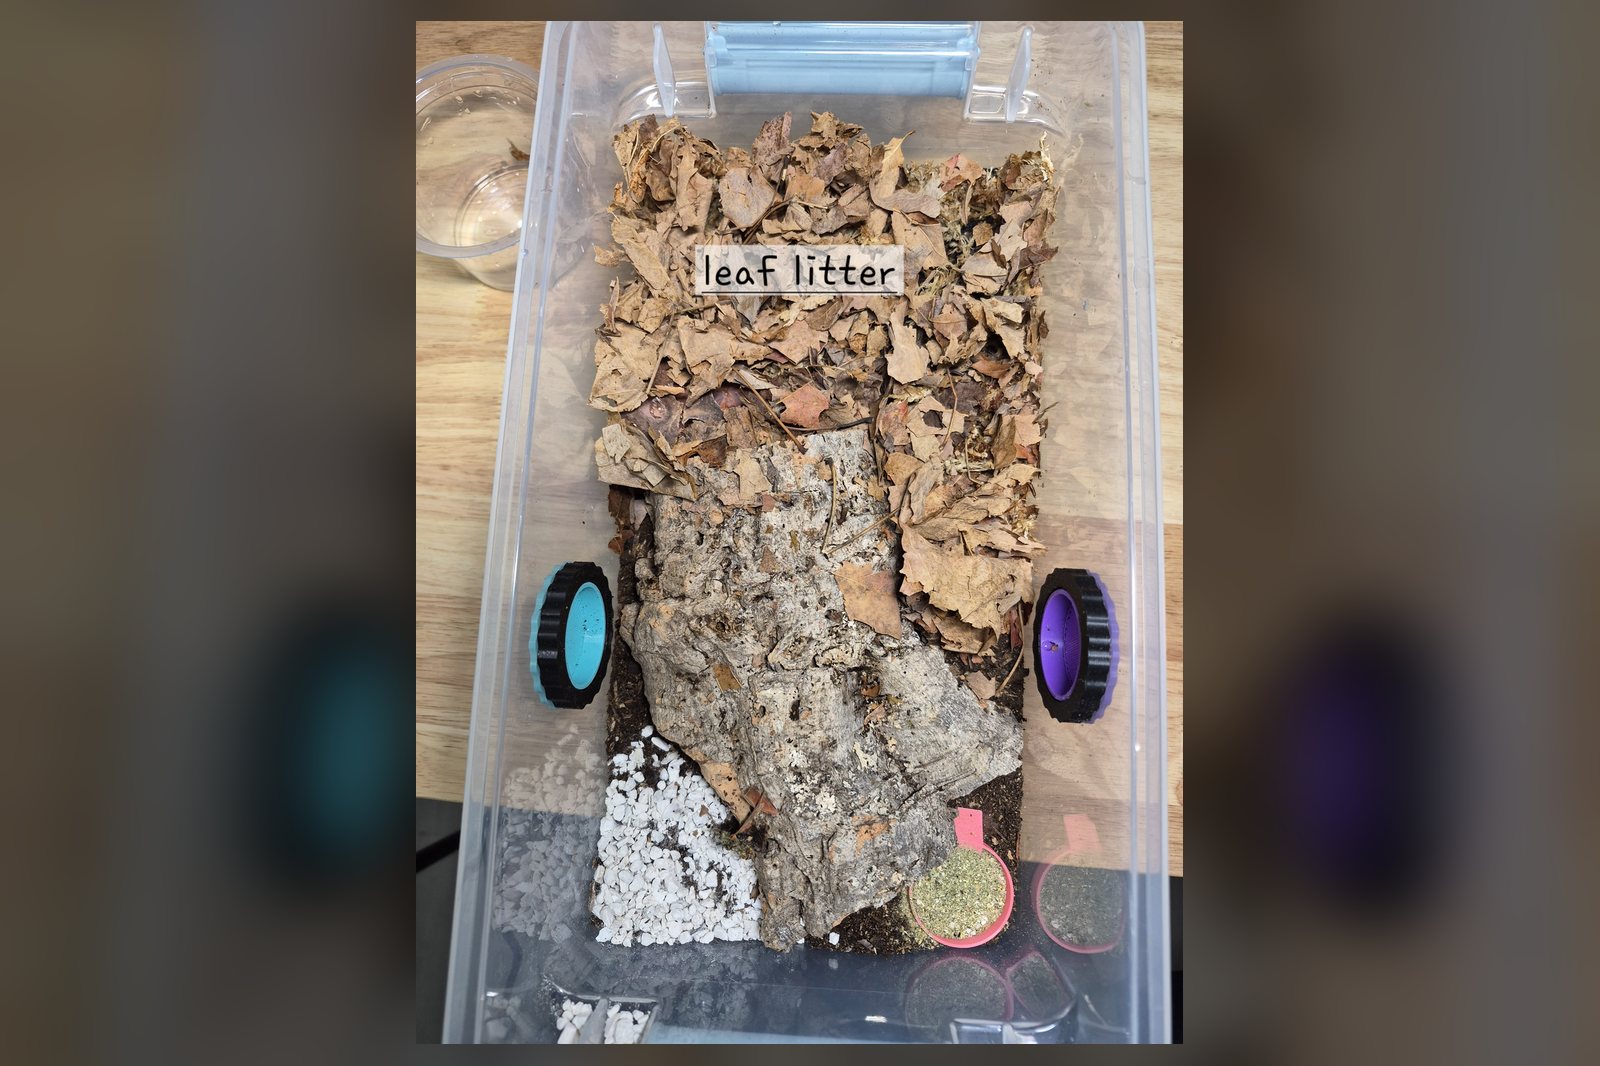
Step 3: Add Leaf Litter
Leaf litter is an essential component of many terrestrial isopod enclosures.
It offers shelter and provides a continuing food source as the leaves break down. It also helps create a more natural environment.
Choose leaves appropriate for the species and make sure they are free from chemical contamination.
You can place a layer of leaves across much of the substrate and replenish it as the colony consumes the material.
Don't rely solely on fresh vegetables or prepared food. Many terrestrial species benefit from having suitable leaf litter consistently available.
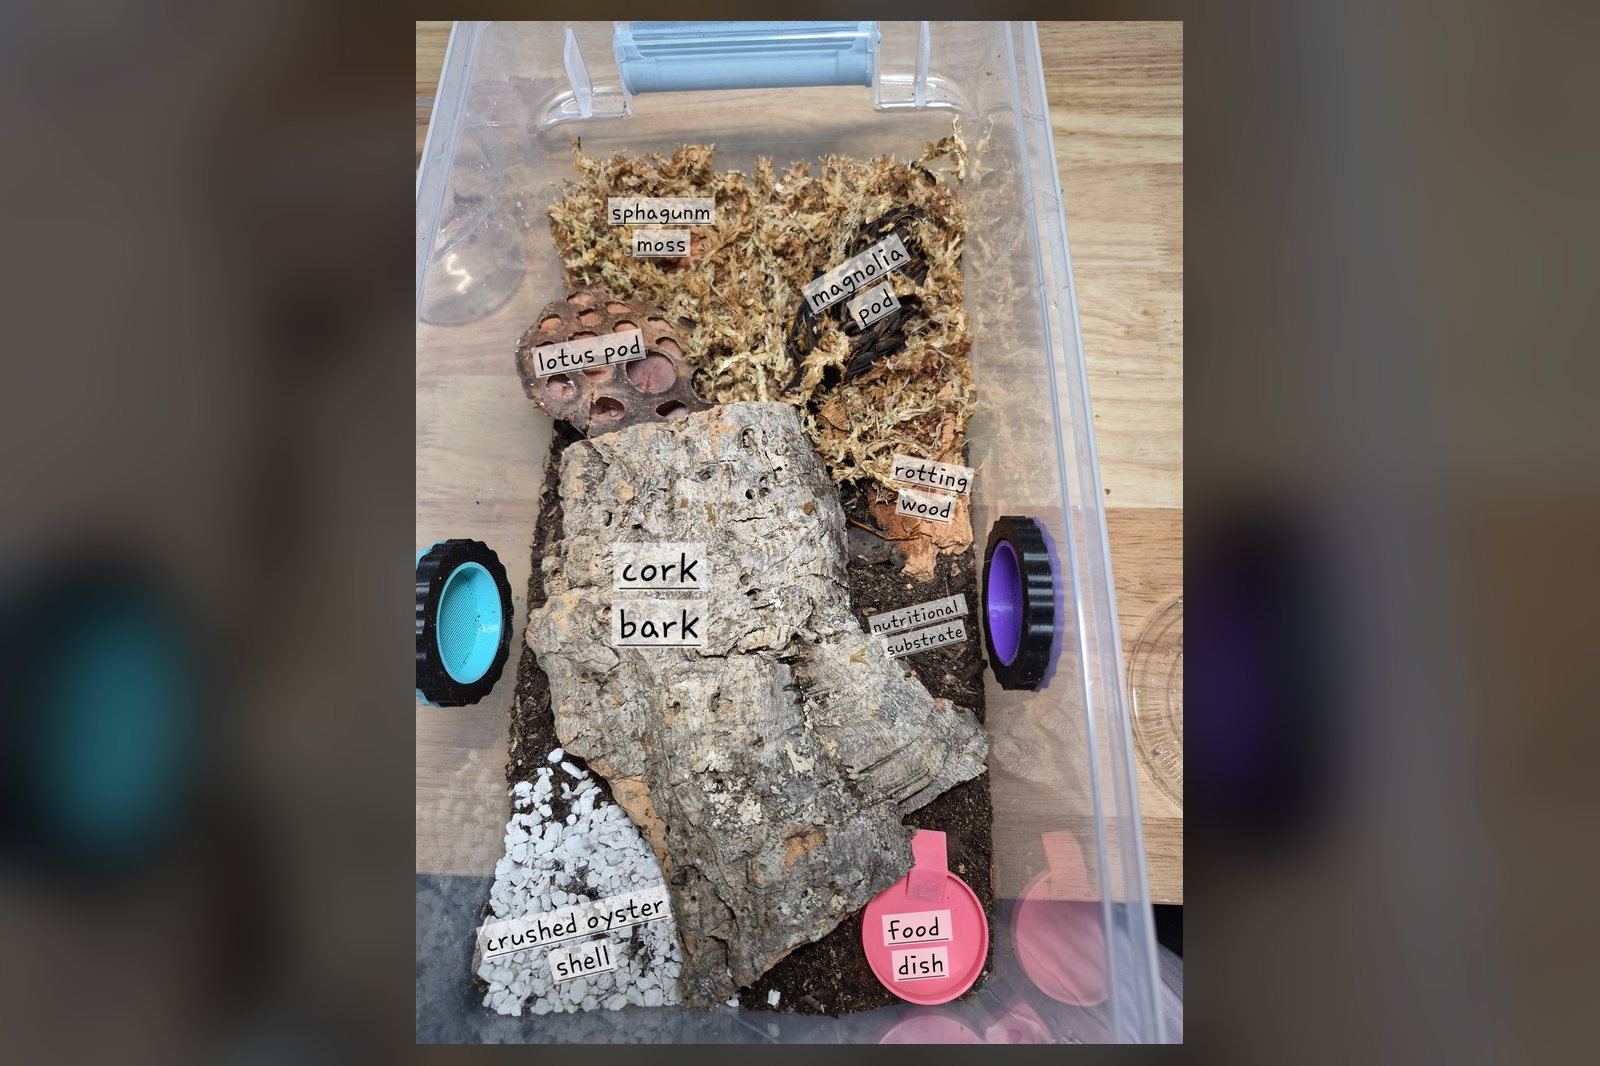
Step 4: Provide Hiding Places
Isopods often spend much of their time beneath leaves, bark, and other cover.
Adding suitable hiding places helps them feel secure and provides opportunities to occupy different parts of the enclosure.
Common choices include:
- Untreated cork bark.
- Safe pieces of hardwood.
- Leaf piles.
- Species-appropriate natural cover.
Arrange the materials so the isopods can move beneath them without the enclosure becoming difficult to inspect.
If you're keeping isopods in a bioactive reptile enclosure, hiding places are particularly important because the reptile may consume the cleanup crew.
Step 5: Create a Moisture Gradient
Moisture management is one of the most important aspects of enclosure design.
Many terrestrial isopods need access to damp areas, but not every species should be maintained in uniformly wet conditions.
A moisture gradient provides areas with different moisture levels so the animals can use the conditions that suit them.
How to Create One
A simple approach for a species that benefits from a gradient is to designate one area as the more consistently moist zone.
You might use moisture-retaining substrate or suitable sphagnum moss in that section. Keep another section comparatively drier, while ensuring the enclosure still meets the species' overall hydration requirements.
Monitor both areas and adjust as needed.
Do not assume that one damp corner is sufficient for every species, or that a dry area should be allowed to become completely desiccated.
Should You Use Sphagnum Moss?
Sphagnum moss can be useful in some enclosures because it retains moisture. It is often placed in a designated moist area rather than spread throughout the entire container.
However, it is not mandatory for every species or setup. Its use should support the moisture conditions required by the particular colony.
Step 6: Establish Appropriate Ventilation and Temperature
After adding the substrate and decor, check that the enclosure can maintain suitable conditions without becoming stagnant or drying out too quickly.
Place it away from:
- Direct sunlight.
- Heating vents.
- Cold drafts.
- Areas with rapid temperature fluctuations.
- Locations where it may be knocked over.
Many commonly kept species can live at suitable indoor temperatures, but species-specific requirements should guide your decision.
Extra heating is not automatically needed. If a species requires additional temperature control, use an appropriate safe method and monitor the actual enclosure conditions.
Step 7: Provide Food and Calcium
Leaf litter and suitable decomposing organic material provide the foundation of the diet for many terrestrial isopods.
Depending on the species, you may also provide a supplemental food designed for isopods, small portions of vegetables, or other appropriate foods.
A suitable calcium source should also be available as part of the overall husbandry plan.
Avoid overfeeding. Uneaten fresh food can decay, contribute to mold, and attract unwanted organisms.
Start with small portions and observe how quickly the colony consumes them.
Step 8: Check the Enclosure Before Introducing Isopods
Before adding your colony, make sure the enclosure is ready.
Use this checklist:
Enclosure readiness checklist
- Container is secure and appropriately ventilated.
- Substrate is suitable for the selected species.
- Leaf litter and safe hiding places are available.
- Moisture conditions match the species' needs.
- Temperature is appropriate and stable.
- Food and a suitable calcium source are available.
- No potentially contaminated materials have been used.
You don't necessarily need to wait a fixed number of days before introducing the colony. What matters is that the enclosure is prepared, its conditions are suitable, and the materials are safe.
Step 9: Introduce Your Isopods Carefully
When your isopods arrive, follow the seller's acclimation instructions.
Avoid immediately making dramatic changes to temperature or moisture. Transfer the animals carefully, minimize unnecessary handling, and provide access to their hiding places.
Some isopods may disappear beneath the leaf litter shortly after introduction. This is normal and does not automatically mean that something is wrong.
Give the colony time to settle in and monitor the enclosure without repeatedly digging through the substrate.
Step 10: Maintain the Enclosure
Once your colony is established, routine maintenance should be relatively straightforward.
Check the enclosure regularly for:
- Moisture levels.
- Temperature changes.
- Uneaten food.
- Persistent mold.
- Changes in colony activity.
- Signs of overcrowding.
Replenish leaf litter as necessary, remove excess food, and adjust conditions carefully.
Avoid unnecessary full substrate changes that may disturb juveniles or remove useful organic material. If a serious problem develops, identify its cause and make targeted changes.
Common Isopod Enclosure Mistakes
Using a Container Without Enough Ventilation
Poor airflow can contribute to excessive moisture and unhealthy conditions. Review ventilation if the enclosure stays persistently wet or develops unpleasant odors.
Keeping the Entire Enclosure Too Wet
Some species need humid conditions, but excessive saturation can still be harmful. Maintain the moisture conditions appropriate for your colony.
Forgetting Leaf Litter
Leaf litter provides shelter and an important food source for many terrestrial species. Replenish it as it breaks down.
Using Contaminated Materials
Pesticides and other contaminants can harm invertebrates. Use materials from sources you trust and avoid collecting substrate or leaves from chemically treated areas.
Choosing an Enclosure Before Choosing a Species
The species' requirements should guide the enclosure design, not the other way around.
Frequently Asked Questions
Can I use a plastic storage tub for isopods?
Yes, a suitable plastic container can work well. It needs appropriate ventilation, a secure lid, sufficient room, and the right substrate and moisture conditions for the species.
Do isopods need a drainage layer?
Not necessarily. Many simple isopod containers can be managed without a dedicated drainage layer. The important factors are suitable substrate, moisture retention, and avoiding waterlogged conditions.
Do isopods need live plants?
No. Live plants are not required for many isopod-only enclosures. They may be included in display or bioactive setups where appropriate, but their presence changes the habitat's maintenance needs.
How often should I clean the enclosure?
There is no fixed schedule. Remove uneaten fresh food, replenish leaf litter, inspect the substrate, and make targeted changes when needed. The frequency depends on the species, colony size, and enclosure conditions.
Can I keep isopods in a glass terrarium?
Yes, if the terrarium provides appropriate ventilation, moisture control, and secure containment. Choose the enclosure based on the species rather than the material alone.
Can I use coconut fiber as isopod substrate?
Coconut fiber may be used as one component of some substrate mixes, but it should not automatically be treated as a complete food source or suitable standalone substrate for every species. Leaf litter and other appropriate organic materials remain important for many terrestrial isopods.
Conclusion: Build the Right Habitat First
A successful isopod enclosure begins with understanding the needs of your chosen species. Select an appropriate container, provide suitable substrate and leaf litter, establish the correct moisture conditions, and make sure ventilation is balanced.
With a little preparation, you can create a stable habitat that supports feeding, molting, reproduction, and normal behavior.
Ready to build your colony? Explore our available isopods and select a species before preparing your enclosure. Choosing the animals first makes it easier to tailor the setup to their actual needs.
In the shop
Priced per isopod. These are the closest matches currently listed, not a promise that every variety in the article is for sale.